Warm compress, cold packs, Epsom salt bath: How to do 6 home therapies properly according to physios
They seem easy to prep but how hot should the water be and how long do you use these home therapies for pain, swelling or recovery? Physiotherapists explain what works and what to avoid doing.
(Photos: iStock/baona and Helin Loik-Tomson)
New: You can now listen to articles.

This audio is generated by an AI tool.

Read a summary of this article on FAST.
Get bite-sized news via a new
cards interface. Give it a try.
Click here to return to FAST
Tap here to return to FAST
FAST
If you’ve just had haemorrhoid surgery or are living with a boba-sized stye on your eyelid, you might have been advised by the doctor to prep a home therapy such as a sitz bath or warm compress.
Nothing to it, right? Until you realise you don’t have a bathtub at home – or that the only towel you have (other than your bath towel) is a quick-drying sports one. Even those cold gel packs for sprains and hot water bottles for menstrual cramps sound simple enough to execute – until you do. How hot should the water be? How long do you leave it on for?
Find out from SingHealth Polyclinics’ senior physiotherapist, Tan Sin Thien, and Allium Healthcare’s principal physiotherapist, Marcus Tow, on what to do when you need a home therapy for quick relief.
1. SITZ BATH
What it’s for: Conditions affecting the pelvic or perineal area, such as haemorrhoids, post-surgical recovery or discomfort from prolonged sitting. “It can help promote circulation, ease discomfort and support hygiene,” said Tow.
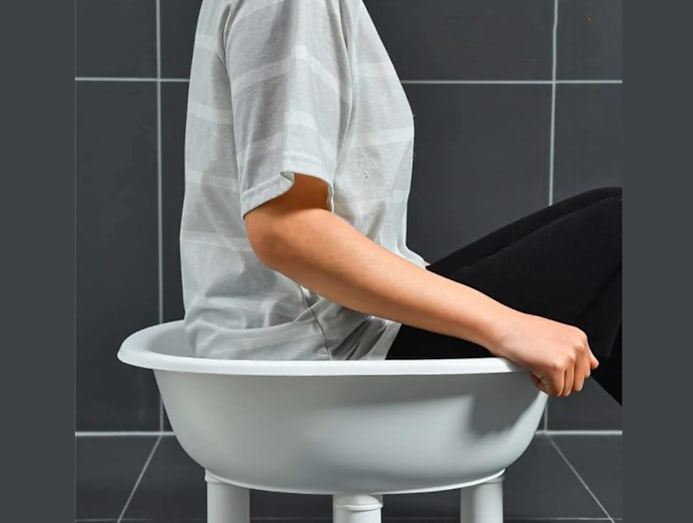
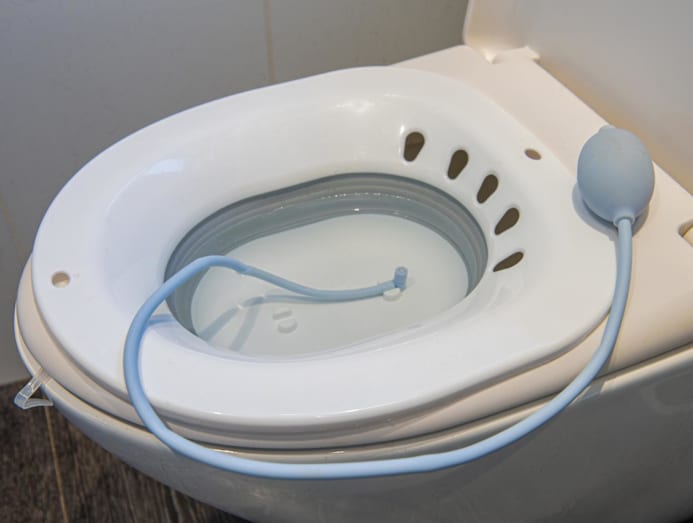
How to prep: Use a bathtub if you have one, or get a plastic basin wide and stable enough to sit comfortably in without feeling cramped, said Tow. “Ideally, the basin should allow the hips and buttocks to be submerged without requiring excessive bending or strain.” For seniors or those with mobility issues, he recommended using a toilet-mounted sitz bath instead.
A sitz bath uses just warm water (unless advised by the doctor), around 37°C to 40°C, to soothe the area. “Test with your wrist or elbow; the water should feel warm but never hot or uncomfortable,” said Tow. “The water only needs to be deep enough to cover the affected area. Generally, 8cm to 10 cm is sufficient.”
Duration and frequency: 10 to 15 minutes per session, two or three times a day, or after bowel movements if advised by the doctor.
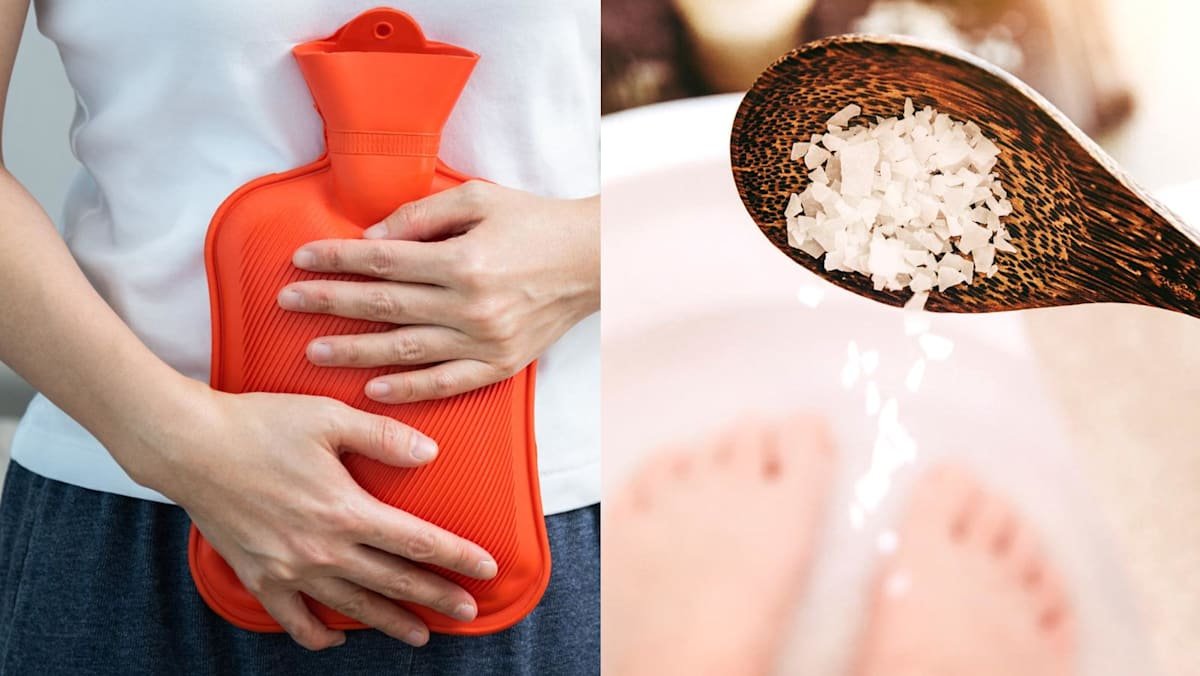
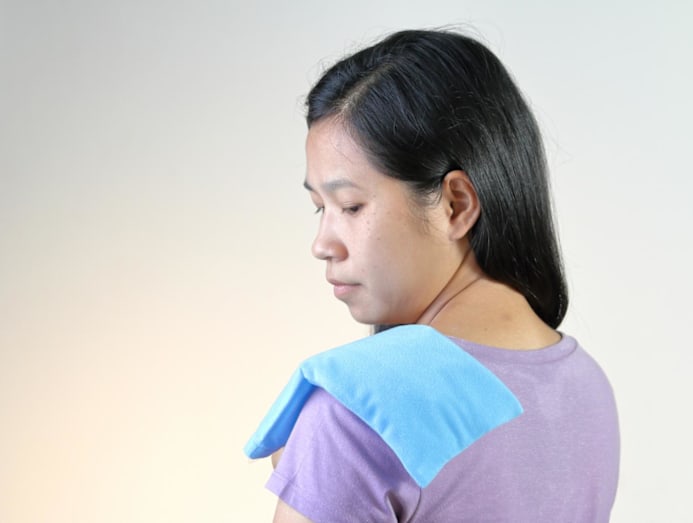
2. WARM COMPRESS
What it’s for: Muscle tightness, joint stiffness, chronic aches or non-acute musculoskeletal pain. “We often use heat to help relax muscles and improve blood circulation, which prepares the joints for movement or stretching,” said Tow, but not for fresh injuries, where there are active swelling and inflammation.
On styes, a warm compress helps to soften the hardened oil blocking the affected eyelid gland, and encourage the stye to open and drain naturally. The warmth can also reduce the pain and irritation.
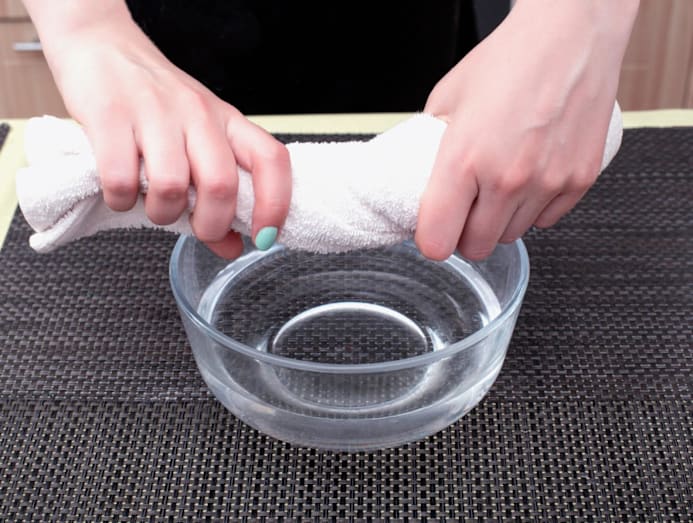
How to prep: Submerge a clean towel into a tub of warm water about 40°C to 45°C, wring until damp (not dripping wet) and fold into a size that fits the treatment area. “For broader areas like the lower back, fold the towel flat,” suggested Tow. “For joints like the knee or neck, rolling or folding the towel into a strip can help contour around the area better.”
Tow recommended using a terry towel over a quick-drying one because it retains heat and moisture better to maintain a consistent temperature for longer. “Sports towels can work in a pinch but they tend to lose heat faster and may not hold enough moisture.”
Duration and frequency: Rewarm the towel and apply to the area every 3 to 5 minutes – depending on how quickly the towel cools. Keep this up for 10 to 20 minutes per session.
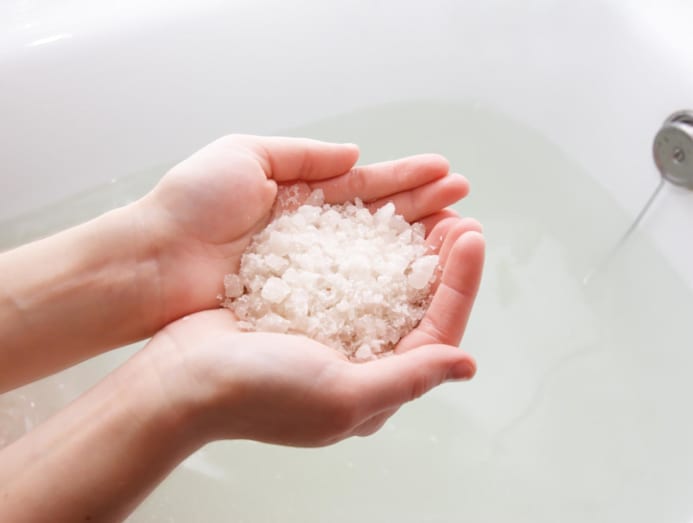
3. EPSOM SALT BATH
What it’s for: Muscle soreness and tension, joint stiffness, minor sprains and bruises, inflammatory conditions like arthritis, ingrown toenails, dry or irritated skin, and for general relaxation, said Tow.
Epsom salt is magnesium sulphate, a naturally occurring compound of magnesium, sulphur and oxygen, first identified in the mineral springs of the United Kingdom’s Epsom, Surrey, in 1618.
When dissolved in warm water, Epsom salt releases magnesium and sulfate ions, which are hypothesised to be transported into the body through the skin. Magnesium and sulfate supposedly help muscles to function, reduce inflammation and aid in joint and tissue healing, said Tow.
But take it with a pinch of salt because the science surrounding transdermal absorption is still evolving. “A small University of Birmingham study found that 12-minute daily soaks raised blood magnesium levels, though no large, randomised controlled trial has yet confirmed clinically meaningful transdermal absorption,” said Tow. “Much of the benefits likely comes from the warm water promoting relaxation, improving circulation and easing muscle tension.”
But certain groups should consult their doctor before dipping into Epsom salt baths, he said, including those with kidney disease, heart failure or severe cardiovascular disease, uncontrolled low blood pressure, open wounds, burns or active skin infection, pregnancy, or diabetes with peripheral neuropathy.
How to prep: The water should be around 33°C to 38°C – warm enough for your wrist or elbow to tolerate. “You shouldn’t have to slowly ease yourself into the tub or sweat while you soak,” said Tow. “Those are two sure signs that the bath is too warm.”
For older adults and especially those with reduced sensation, err on the side of using cooler rather than hotter water, he added. “A burn risk is very real for anyone with diabetes, peripheral neuropathy or reduced skin sensitivity.”
As for the quantity of Epsom salt to use, Tow suggested one to two cups (use a standard mug if you don’t have a measuring cup). For a foot soak, roughly half a cup in a basin is sufficient. “Adding the salt while the water is running helps ensure it dissolves properly. The exact amount is not critical; start conservatively and adjust based on how your skin responds.”

Duration and frequency: 20 minutes is the sweet spot, said Tow. “It’s long enough for absorption; short enough for the skin to maintain its oils. Thirty minutes is the maximum.” For older persons or those with cardiovascular conditions, he advised keeping the soak to 10 to 15 minutes, and have someone nearby for safety when stepping out of the bath.
For most healthy adults, taking an Epsom salt bath twice or thrice weekly is safe, according to Tow. Those with sensitive skin, dry skin, or conditions like eczema or psoriasis can limit the baths to one or two times a week – and monitor for discomfort.
If you have sensitive skin, rinse off with warm water after soaking to remove the salt residue. “However, some theorise that skipping the rinse may allow continued magnesium absorption and prolong the relaxation benefits,” said Tow. If your skin tolerates the Epsom salt well, just pat dry – don’t rub. And rinse if any discomfort arises.
Can you combine Epsom salt with bath bombs or essential oils?
You can, said Allium Healthcare’s principal physiotherapist, Marcus Tow. If you have sensitive skin, opt for a plain bath salt as most bath bombs contain non-natural ingredients such as artificial fragrances and colours that may cause irritation.
Make sure everything is well dissolved in the water before getting in. That’s because baking soda (used in bath bombs) and Epsom salts may not disperse essential oils evenly in the water, which can lead to potential skin irritation, he said.
If you’re adding essential oils, always mix them with a carrier oil such as coconut or jojoba first before adding them to the bath. Safe choices include lavender, chamomile or eucalyptus when properly diluted, said Tow.
Avoid “hot” essential oils such as cinnamon bark, cassia, oregano and thyme as they can be irritating to skin, he said. Don’t use peppermint in a full bath (a foot soak is okay) because it can produce a burning sensation in sensitive areas. Citrus oils like lemon and orange can cause photosensitivity.
Collapse
Expand
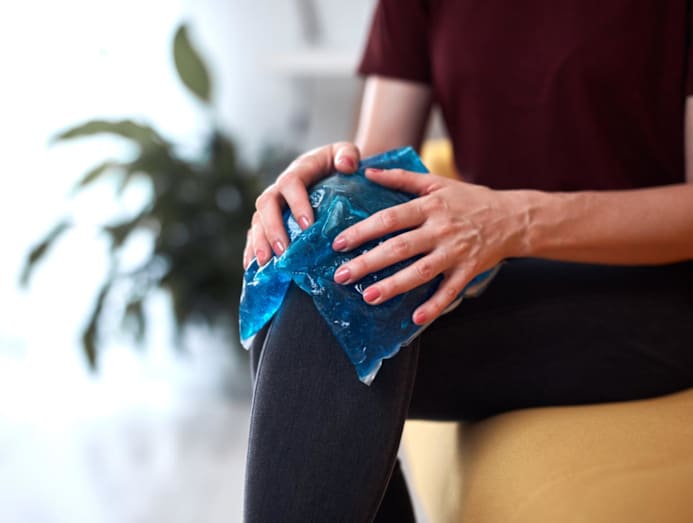
4. COLD GEL PACK
What it’s for: Acute musculoskeletal injuries and inflammatory conditions. “These include recent sprains and strains, bruising, post-surgical swelling, arthritis flare‑ups and muscle aches following intense physical activity,” said Tan.
“Cold therapy works by constricting blood vessels, a process known as vasoconstriction, which helps limit blood flow to the affected area. This, in turn, reduces swelling, inflammation, pain and bleeding, making it an effective first-line treatment for short-term injury management.”
How to prep: After removing the gel pack from the freezer, let it sit at room temperature for 1 to 2 minutes. “Or gently flex or knead the pack to improve flexibility,” said Tan. “Do not microwave or heat a frozen gel pack as this can damage it, or result in uneven temperatures that may cause discomfort or injury.”
Wrap the pack with a single layer of a thin towel or T‑shirt. “The purpose of this layer is to create a protective barrier between the skin and the pack to prevent ice burns or frostbite,” Tan explained. Remove immediately if the skin feels numb or painful, or looks excessively pale as these are signs of excessive cold exposure.
Most reusable gel packs should be placed in the freezer for at least one hour before use, said Tan. “A gel pack is ready for use once it is thoroughly chilled. It does not need to be completely frozen like ice but it should feel uniformly chilled when pressed.”
Duration and frequency: Not more than 10 to 15 minutes per session, recommended Tan. After the duration, remove the pack to allow the skin to return to its normal temperature for at least 1 to 2 hours before reapplication.
“This process can be repeated for up to three to five times per day, depending on individual tolerance,” said Tan. “For best results and safety, adjust based on comfort level and any specific advice provided by your healthcare professional.”
5. HOT WATER BOTTLE
What it’s for: Muscle tension, muscle spasms, joint stiffness, chronic low back pain and menstrual cramps. “It may also be advised during the later stages of injury recovery, once swelling and acute inflammation have subsided,” said Tan.
Heat helps to relax tightened or overworked muscles, she continued, while increasing blood flow to bring oxygen and nutrients to support muscle recovery. “Together, these effects help reduce muscle spasms, ease cramping sensations and relieve discomfort.”
How to prep: Use only hot water bottles made from heat‑resistant materials and designed to safely retain hot water for extended periods, said Tan. No regular water bottles as they may deform, leak or worse, burst when filled with hot water.
The hot water bottle should only be filled to about two‑thirds full, said Tan, to allow the bottle to remain flexible against your body – all while reducing its internal pressure that could cause leaks or seal failure.
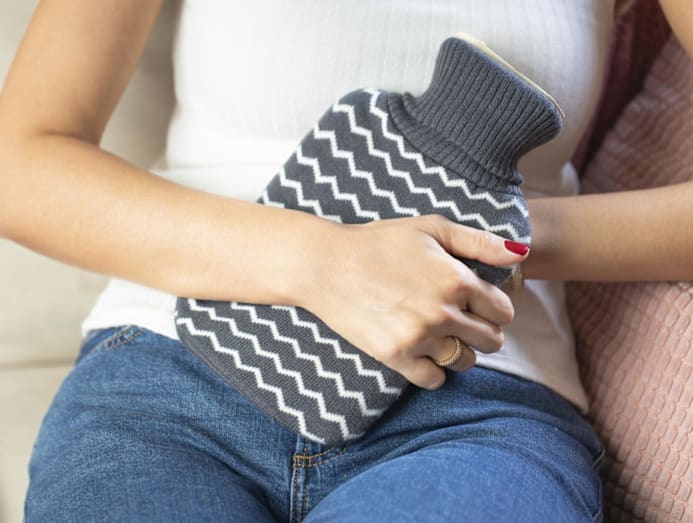
The water should be hot but not boiling, Tan advised. Generally, the temperature should be about 60°C but in our climate, a cooler temperature should be used, she said. When heating the water in a kettle, test the steam; if you can quickly sweep your hand over the steam without discomfort, the temperature is usually safe, she said.
Wrap the filled hot water bottle in a towel, cloth or fitted cover to create a protective barrier between the bottle and your skin – and distribute heat more evenly, said Tan. Use the bottle in an air‑conditioned room or at night to make it comfort and prevent excessive heat exposure.
Duration and frequency: When the bottle no longer provides noticeable comfort, it is time to stop the session, said Tan. Or refill it with hot water if you wish to continue using it.
6. HEAT PACK
What it’s for: See hot water bottle.
Single‑use heat packs typically use iron powder to generate heat through oxidation, Tan explained. “Reusable heat packs, on the other hand, contain sodium acetate, which releases heat through a process called crystallisation when they are activated.”
Most medical-grade heat packs are designed to reach temperatures of about 40°C to 55°C. “Heat packs generally provide lower, more controlled temperatures, which helps reduce the risk of burns or skin injury,” said Tan, and are preferred over hot water bottles.
How to prep: Two to four layers of clothing or cloth should be placed between the heat pack and skin to reduce the risk of burns or skin irritation, noted Tan. Most self-adhesive heat packs are designed to be stuck on clothing or an inner fabric layer, rather than directly onto bare skin.
“This precaution is especially important for people with sensitive skin, impaired sensation, poor circulation or conditions such as diabetes, who may be more vulnerable to heat-related injuries,” she said.
Duration and frequency: 15 to 20 minutes at a time. “After each session, the skin should be allowed to cool and rest before reapplication to help prevent burns or skin irritation,” said Tan.
Source: CNA/bk
RECOMMENDED
Get bite-sized news via a new
cards interface. Give it a try.
Click here to return to FAST
Tap here to return to FAST
FAST